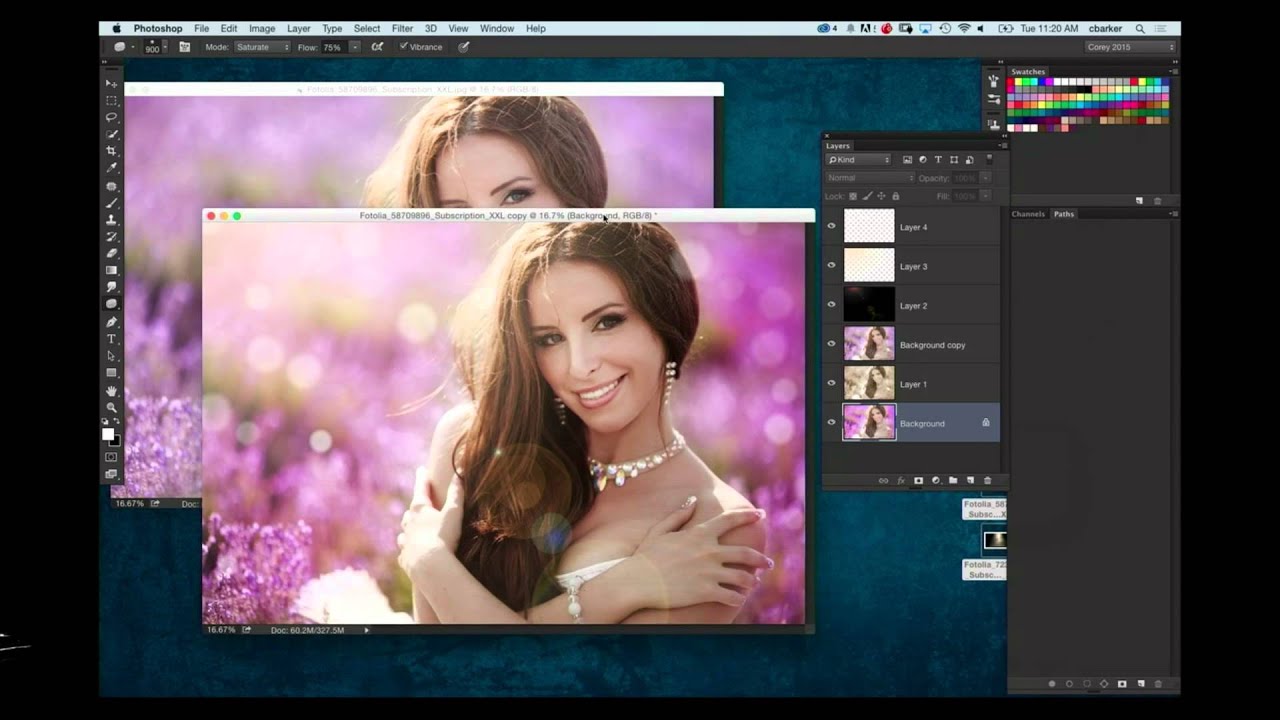
There’s a gap I see constantly between photographers who light well in the studio and photographers who finish well in post. I’ve been on both sides of it. When I was coming up, I treated Photoshop like a cleanup tool, something you used to fix mistakes rather than build atmosphere. What changed my thinking was realizing that the best retouchers work with the light that’s already in the frame, they don’t invent it from scratch. They read the shot and then amplify what the camera almost captured.
That’s exactly what’s demonstrated in this Watch the full tutorial on YouTube episode from KelbyOne, where Cory Barker walks through a layered approach to enhancing portrait lighting using blend modes, colorization, and a rendered lens flare. The subject is a stock image with natural sunlight, and the goal is to make it feel warmer, moodier, and more deliberate without overprocessing it. The technique is simple enough to finish in ten minutes, and transferable to almost any portrait with a readable light source.
What I appreciate about this approach is the discipline behind it. Barker isn’t adding light randomly. He’s looking at the image, finding where the sun is actually hitting, and using that position as the anchor for every effect he builds. That’s the same logic I use when I sketch lighting setups in my journal before a shoot. The physics don’t change just because you’re working in software.
Step 1: Duplicate the Background Layer and Set Blend Mode to Multiply
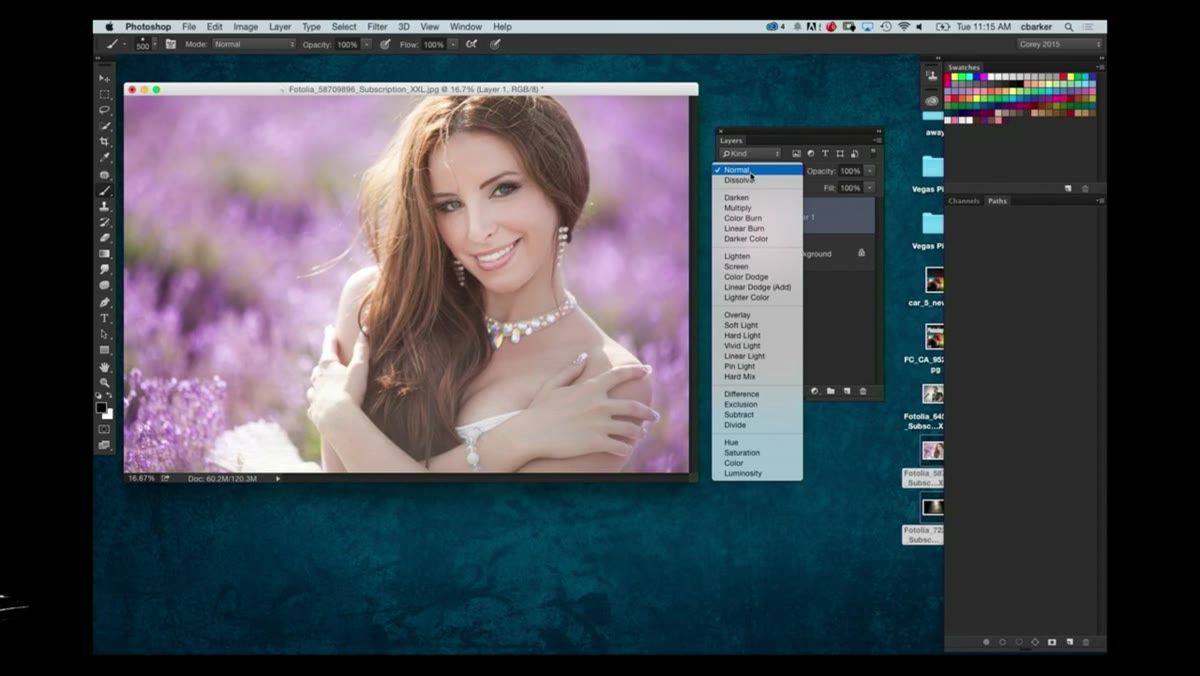 Blend mode dropdown set to Multiply on duplicated layer
Start with your portrait open in Photoshop. Duplicate the background layer, then change the blend mode of that duplicate to Multiply. This darkens the entire image significantly, which sounds counterintuitive when you’re trying to enhance lighting, but stay with it. The darkening is intentional. It gives you a base to work color and opacity against, rather than pushing from a neutral starting point.
Blend mode dropdown set to Multiply on duplicated layer
Start with your portrait open in Photoshop. Duplicate the background layer, then change the blend mode of that duplicate to Multiply. This darkens the entire image significantly, which sounds counterintuitive when you’re trying to enhance lighting, but stay with it. The darkening is intentional. It gives you a base to work color and opacity against, rather than pushing from a neutral starting point.
You’re not going to leave this layer at full strength or with its native color, so don’t panic when the image looks heavy.
Step 2: Apply a Warm Color Cast Using Hue/Saturation
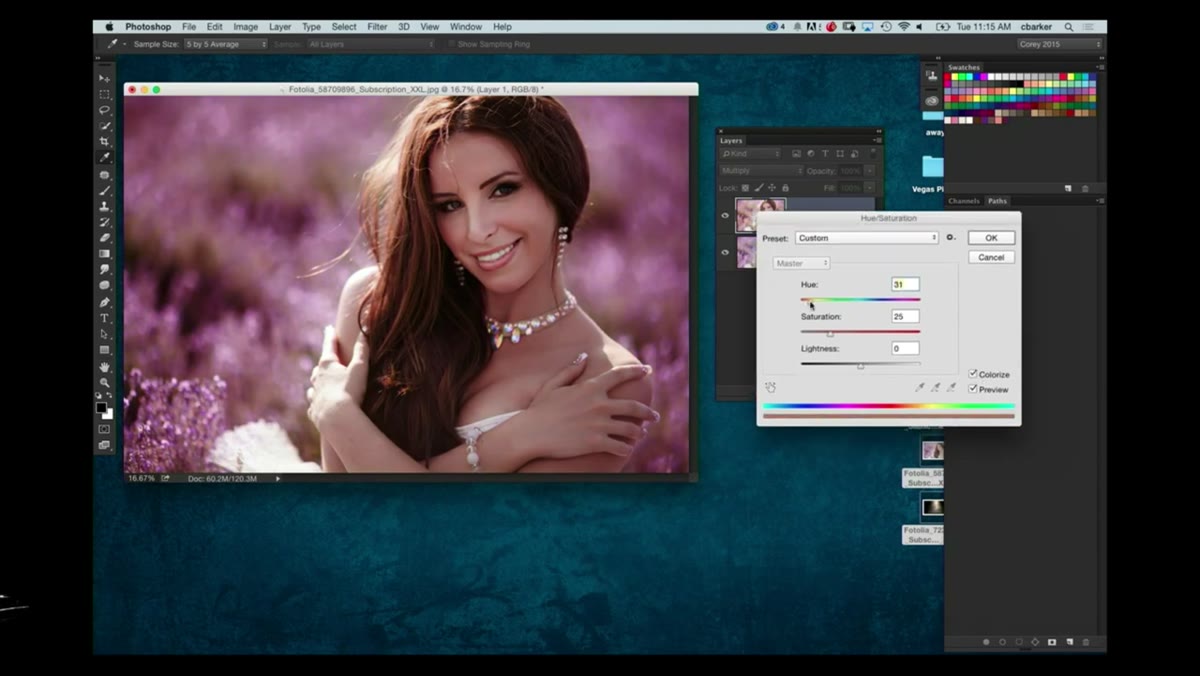 Hue/Saturation dialog open with Colorize checked
With the Multiply layer selected, open Hue/Saturation using Command+U (Ctrl+U on Windows). Check the Colorize box. This replaces the layer’s color information with a single hue you can dial in manually. Shift the Hue slider toward a warm yellow-orange range. You’re not trying to make this look like a sunset, you’re nudging the color temperature of the shadow layer toward warmth, the way late afternoon sun would push into the midtones.
Hue/Saturation dialog open with Colorize checked
With the Multiply layer selected, open Hue/Saturation using Command+U (Ctrl+U on Windows). Check the Colorize box. This replaces the layer’s color information with a single hue you can dial in manually. Shift the Hue slider toward a warm yellow-orange range. You’re not trying to make this look like a sunset, you’re nudging the color temperature of the shadow layer toward warmth, the way late afternoon sun would push into the midtones.
The goal is a yellowish cast that reads as sunlight without screaming “filter applied.” If it looks like someone held a gel over the lens, back the Hue slider off slightly. Subtlety is doing more work here than you think.
Step 3: Reduce Opacity on the Multiply Layer
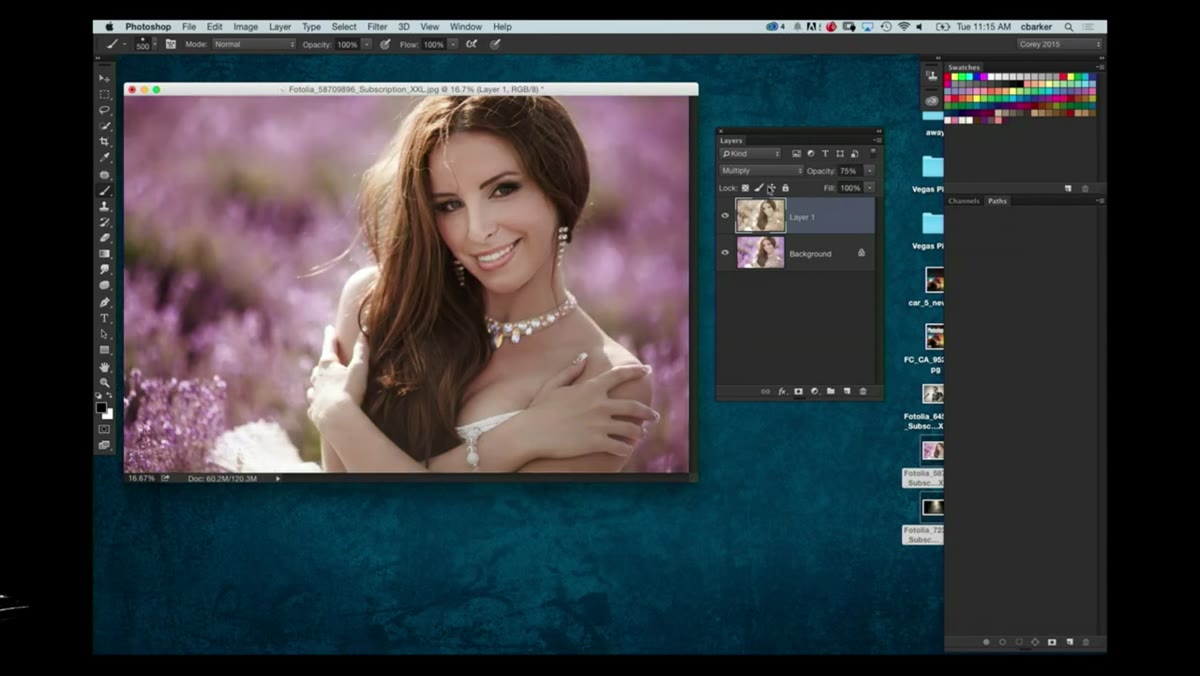 Opacity slider pulled down to 75% on Multiply layer
Bring the opacity of this Multiply layer down to around 75%. This lets the original image information breathe back through while keeping the warm darkening effect intact. The percentage isn’t sacred. Depending on the brightness of your original image, you might land anywhere from 65 to 80 percent. Trust your eyes more than the number.
Opacity slider pulled down to 75% on Multiply layer
Bring the opacity of this Multiply layer down to around 75%. This lets the original image information breathe back through while keeping the warm darkening effect intact. The percentage isn’t sacred. Depending on the brightness of your original image, you might land anywhere from 65 to 80 percent. Trust your eyes more than the number.
At this point the image should feel slightly warmer and heavier than the original, like a small increase in humidity in the atmosphere of the photo.
Step 4: Add a Second Background Duplicate and Set to Soft Light
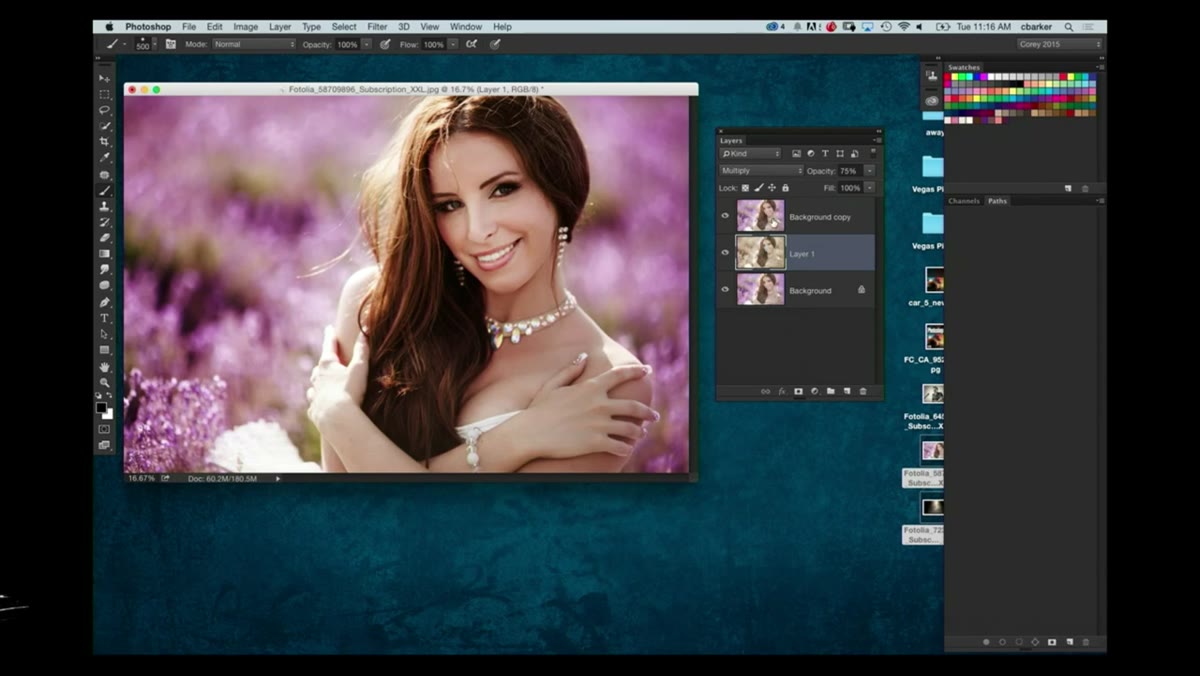 Second duplicate layer set to Soft Light blend mode
Duplicate the original background layer again and drag it above both existing layers. Set this one to Soft Light. Where Multiply pushed the image darker, Soft Light brings back the highlights and restores contrast without blowing out the bright areas. Color saturation comes back, skin tones regain their depth, and the image starts to look finished rather than manipulated.
Second duplicate layer set to Soft Light blend mode
Duplicate the original background layer again and drag it above both existing layers. Set this one to Soft Light. Where Multiply pushed the image darker, Soft Light brings back the highlights and restores contrast without blowing out the bright areas. Color saturation comes back, skin tones regain their depth, and the image starts to look finished rather than manipulated.
Reduce the opacity of this Soft Light layer to around 50%. The combination of the two layers, a warm Multiply layer underneath and a half-strength Soft Light layer on top, creates a look that has more complexity than a single adjustment could produce. The contrast feels earned rather than slapped on.
Step 5: Create a Black-Filled Blank Layer for the Lens Flare
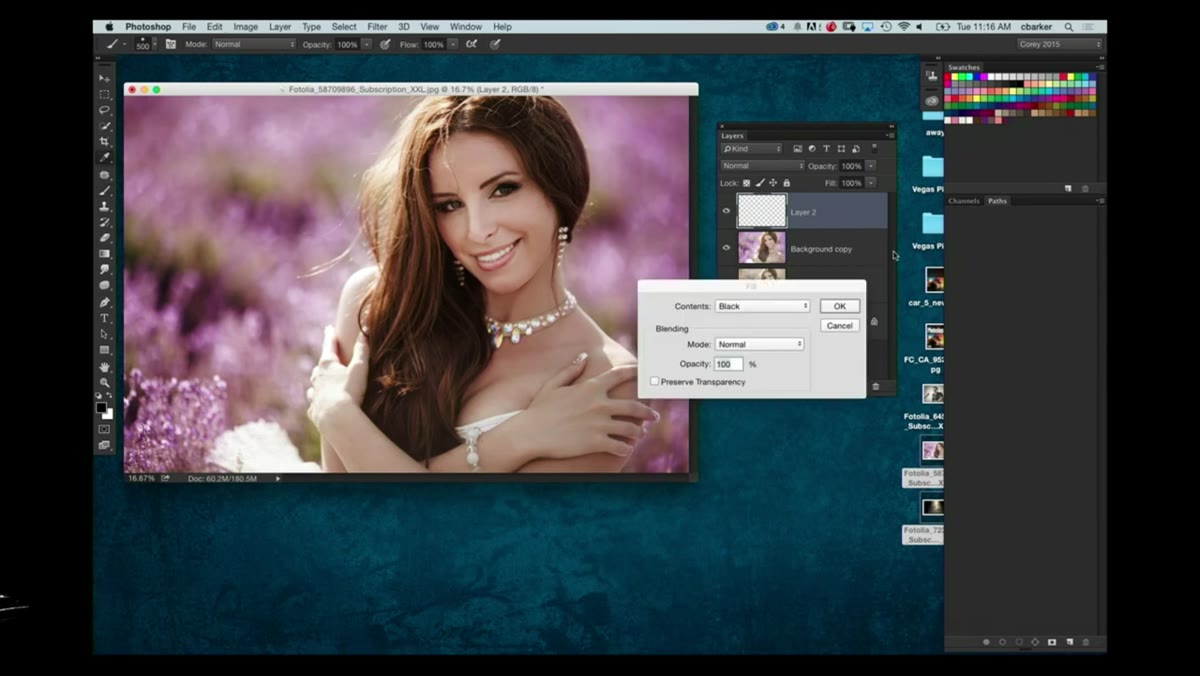 New blank layer filled solid black above all other layers
Create a new blank layer above everything. Fill it with solid black using Edit > Fill, selecting black at 100% opacity with Normal blend mode. This gives you a neutral surface to render the lens flare onto without it affecting the layers below yet. The black will disappear later once you change the blend mode, but working on a black fill gives Photoshop a clean target for the render.
New blank layer filled solid black above all other layers
Create a new blank layer above everything. Fill it with solid black using Edit > Fill, selecting black at 100% opacity with Normal blend mode. This gives you a neutral surface to render the lens flare onto without it affecting the layers below yet. The black will disappear later once you change the blend mode, but working on a black fill gives Photoshop a clean target for the render.
Step 6: Render the Lens Flare Positioned to Match the Existing Light Source
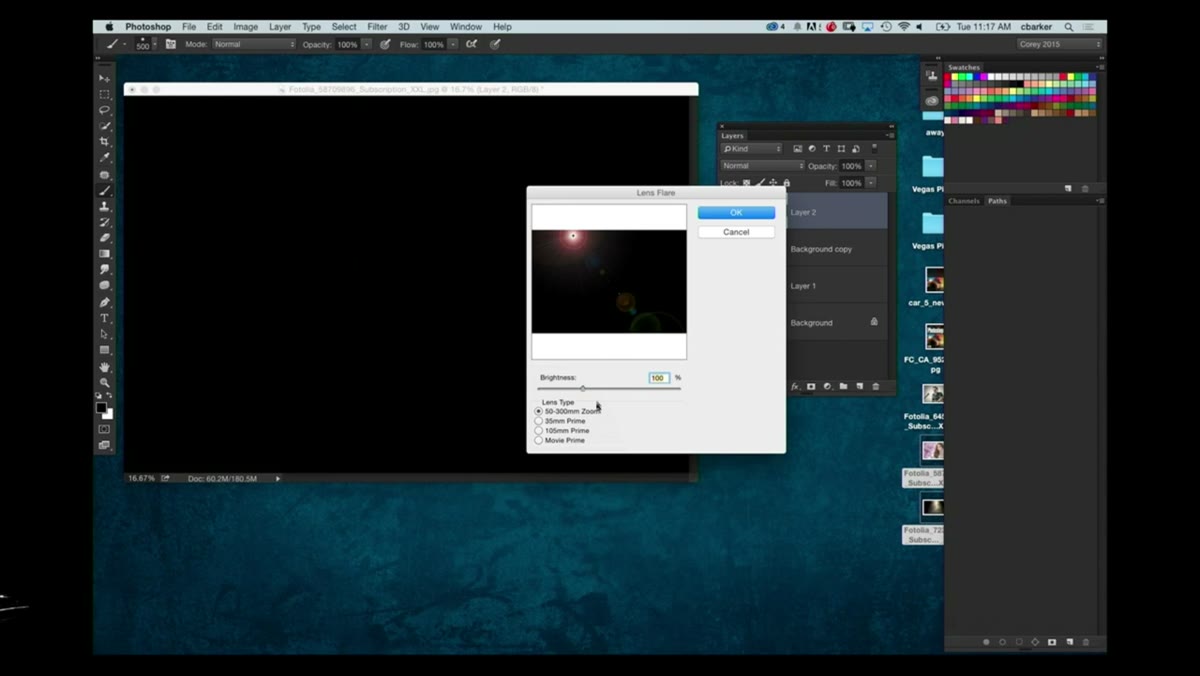 Lens Flare dialog with flare positioned upper left of frame
Go to Filter > Render > Lens Flare. In the dialog, choose the 50-300mm Zoom option and leave brightness at 100. Here’s the critical part: look at your original image and find where the actual light source is. In this case there’s sunlight coming from the upper left above the subject. Position the lens flare crosshair in that same area of the preview. The flare has to originate from a place that already has light in the frame or the effect reads as fake immediately.
Lens Flare dialog with flare positioned upper left of frame
Go to Filter > Render > Lens Flare. In the dialog, choose the 50-300mm Zoom option and leave brightness at 100. Here’s the critical part: look at your original image and find where the actual light source is. In this case there’s sunlight coming from the upper left above the subject. Position the lens flare crosshair in that same area of the preview. The flare has to originate from a place that already has light in the frame or the effect reads as fake immediately.
This is where a lot of photographers go wrong with lens flares in post. They place them decoratively rather than logically. Light has a source. Your flare needs one too.
Step 7: Change the Flare Layer Blend Mode to Screen
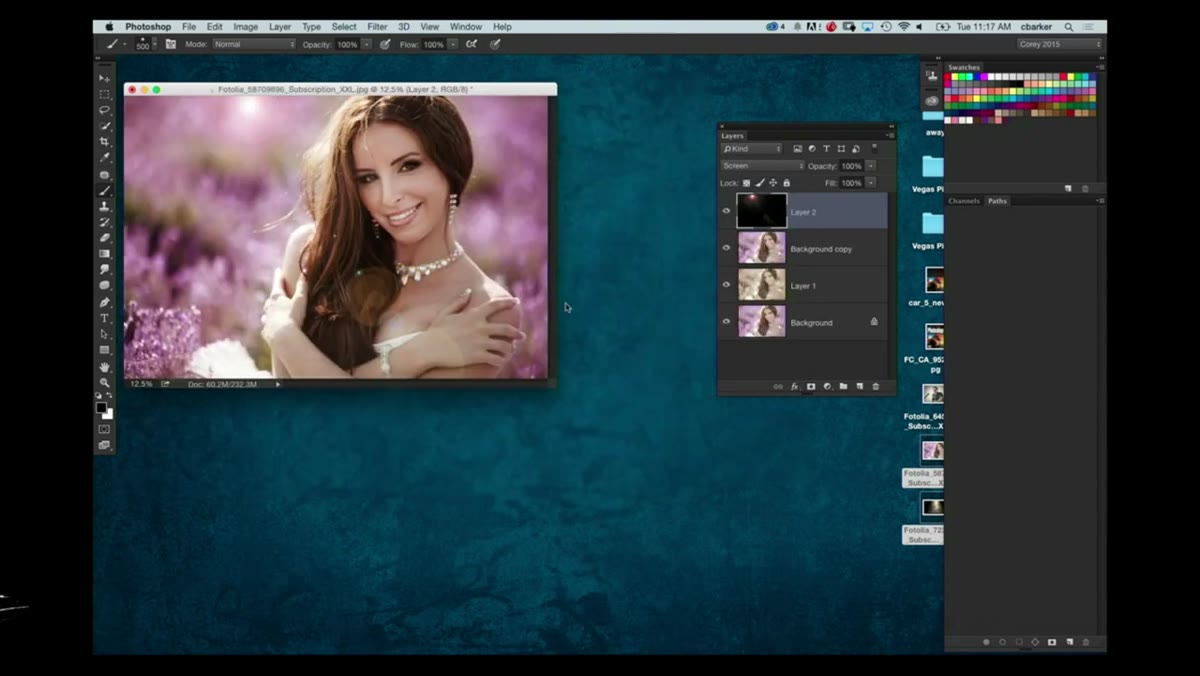 Flare layer blend mode changed to Screen, black disappears
Change the blend mode of your black-filled lens flare layer to Screen. The black drops out entirely, and only the bright lens flare elements remain, sitting over the image as if they were optically captured. Because the flare is positioned where the real light source exists in the photo, the effect integrates instead of floating.
Flare layer blend mode changed to Screen, black disappears
Change the blend mode of your black-filled lens flare layer to Screen. The black drops out entirely, and only the bright lens flare elements remain, sitting over the image as if they were optically captured. Because the flare is positioned where the real light source exists in the photo, the effect integrates instead of floating.
If the flare is too intense, reduce the layer’s opacity. If the positioning isn’t perfect, you can nudge the layer with the Move tool.
A Note on When to Use This, and When to Stop
I’d apply this technique on images where a strong directional light source already exists. Overcast flat light doesn’t give you enough information to anchor the flare, and the warm Multiply cast will just make everything muddy. I’ve also learned to match my Hue/Saturation colorize values to the actual color temperature I shot at. When I used to skip that calibration step, the warm cast would fight the existing white balance and the skin tones would look jaundiced rather than golden. The Multiply layer has to agree with the light that’s already there, not argue with it.
This technique is also worth keeping modest in the number of layers. Two blend mode layers plus the flare is usually the ceiling before it starts looking composited. The simplicity is part of why it works.
The single most important idea in this whole approach is that Photoshop lighting effects only succeed when they respect the physics of the original image. Amplify what’s there. Don’t invent what isn’t.
Watch the full tutorial on YouTube and watch how Barker positions the lens flare in real time. Seeing the decision-making process is worth more than any written description of it.
Comments
Leave a Comment