
There is a version of my studio from about six years ago that I am not proud of. Cables everywhere, a monitor positioned so the window threw glare directly across the screen, editing happening on a machine that wheezed through Lightroom exports. The work I was doing for clients was solid but the environment I was doing it in was working against me. I have spent years since then iterating on the setup until it actually supports the pace of commercial work. So when I came across a video where a creator I respect pulled back the curtain on how they actually run their physical workspace, I paid attention.
In this Peter McKinnon tutorial from 2021, Watch the full tutorial on YouTube, McKinnon walks through every element of his in-studio desk setup: the monitors, the computer, the ergonomics, and the thinking behind positioning everything. What made it useful for me was not the specific products he named but the logic connecting each decision. That logic translates directly to a working photographer’s studio, where the desk is not just for email but for color grading, client reviews, and the kind of deep focus that bad environments destroy.
The section that stopped me was his point about rearranging a space as a tool for resetting creativity. I have done this instinctively for years. I keep masking tape labels on every light in my studio so I can reconfigure fast without second-guessing what is what. What McKinnon articulated was the reason it works: changing the physical environment shifts your mental posture. That is not soft advice. That is practical studio management.
Step 1: Position Your Desk at the Back of the Workflow, Not the Center
 Peter McKinnon pointing toward back of studio space
McKinnon places his desk at the far back of his studio specifically so that active shooting, meetings, and production activity can happen without his editing station becoming an obstacle or a distraction. The desk is behind the work, not in the middle of it. If you are running any kind of working studio, even a solo operation with the occasional assistant, this separation matters. Your editing and review station should be reachable quickly but not in the sightline of anyone setting up a shot or talking to a client.
Peter McKinnon pointing toward back of studio space
McKinnon places his desk at the far back of his studio specifically so that active shooting, meetings, and production activity can happen without his editing station becoming an obstacle or a distraction. The desk is behind the work, not in the middle of it. If you are running any kind of working studio, even a solo operation with the occasional assistant, this separation matters. Your editing and review station should be reachable quickly but not in the sightline of anyone setting up a shot or talking to a client.
In my own studio in Los Angeles, the editing corner is positioned so I can spin the chair and see the shooting area without walking there. It also means ambient light from softboxes and strobes does not wash across my monitor during a tethered shoot. Positioning is not decorative. It is a light control decision as much as anything else.
Step 2: Choose a Desk for Surface Size and Material Match, Not Just Function
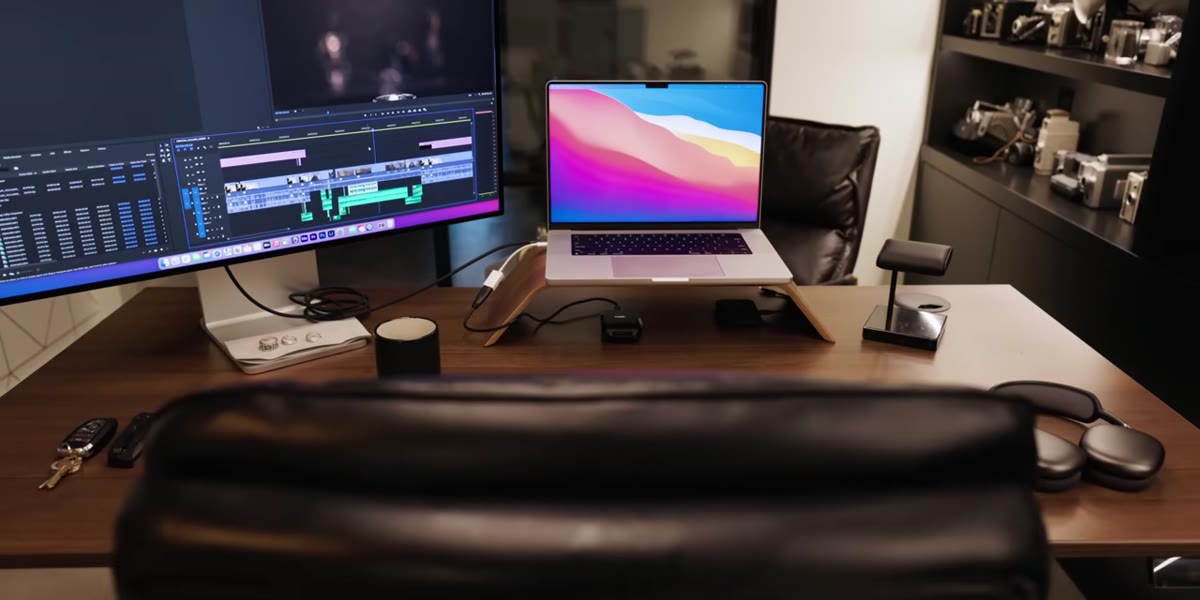
 Wide shot of standing desk with walnut surface in studio
McKinnon uses a standing desk but does not actually stand at it. He chose it for the surface dimensions and because the walnut finish matched the other surfaces in the space. This sounds like aesthetics but it is really about cognitive load. When your environment is visually coherent, you stop noticing it. When it is not, you keep registering small visual conflicts that pull you out of focus.
Wide shot of standing desk with walnut surface in studio
McKinnon uses a standing desk but does not actually stand at it. He chose it for the surface dimensions and because the walnut finish matched the other surfaces in the space. This sounds like aesthetics but it is really about cognitive load. When your environment is visually coherent, you stop noticing it. When it is not, you keep registering small visual conflicts that pull you out of focus.
A sitting desk that fits your actual gear footprint without crowding is worth more than a standing desk you bought for the aspiration. Measure what you actually put on a desk: monitors, tablets, a keyboard, a reference print or two. Then find a surface that holds all of it without requiring you to move things to do your work.
Step 3: Use a Monitor Stand to Create a Two-Screen Layout at Correct Eye Height
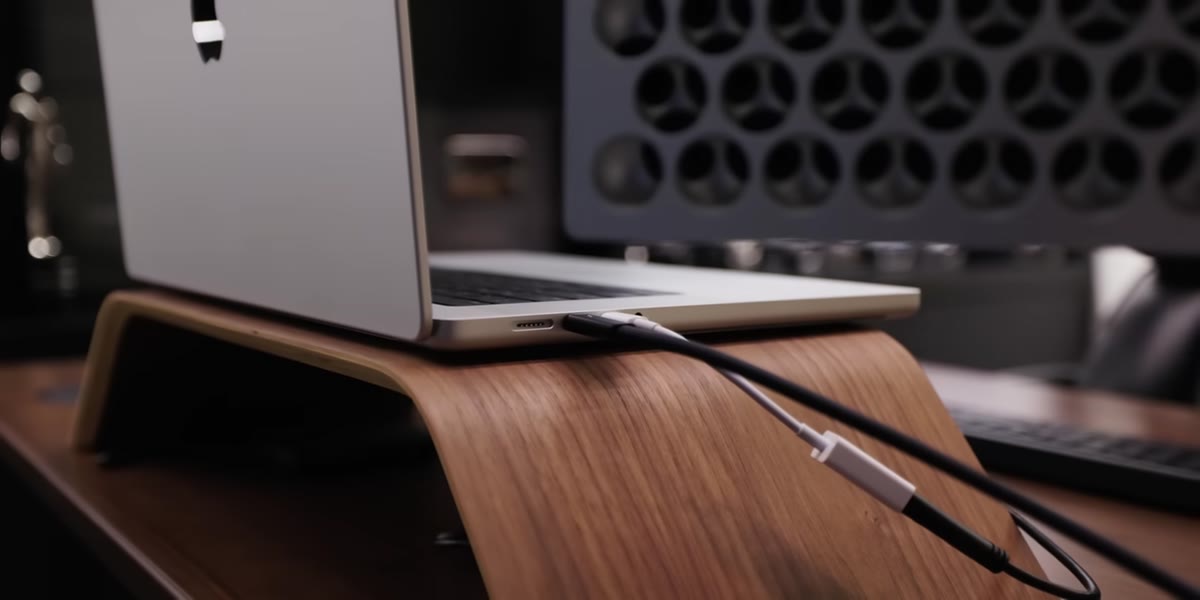 Laptop elevated on Grove Made stand next to main monitor
McKinnon places his laptop on a riser from Grove Made, originally designed for an iMac, which elevates the screen to roughly the same working height as his primary display. This creates a two-monitor setup without a second dedicated monitor. For photographers, this is immediately useful: one screen for your editing application, one screen for client communication, reference images, or a browser tab with your shot list.
Laptop elevated on Grove Made stand next to main monitor
McKinnon places his laptop on a riser from Grove Made, originally designed for an iMac, which elevates the screen to roughly the same working height as his primary display. This creates a two-monitor setup without a second dedicated monitor. For photographers, this is immediately useful: one screen for your editing application, one screen for client communication, reference images, or a browser tab with your shot list.
Eye height matters more than most photographers realize. If your secondary screen is flat on the desk, you are bending your neck down to reference it constantly. Over a long editing session that adds up. The riser brings the laptop screen to a height where you can shift your gaze laterally rather than vertically, which is less fatiguing and keeps your posture neutral while you are working through a 400-image fashion delivery.
Step 4: Invest in Anti-Reflective Monitor Glass if You Work With Controlled Lighting
 Apple Pro Display XDR shown from viewing angle in lit studio
McKinnon uses the Apple Pro Display XDR with nano-texture glass specifically because his studio runs multiple LED strips and accent lights. Standard glossy monitor glass turns those sources into visible reflections across your screen, which makes color grading unreliable. The nano-texture coating diffuses those reflections without degrading the image the way a matte plastic screen protector would.
Apple Pro Display XDR shown from viewing angle in lit studio
McKinnon uses the Apple Pro Display XDR with nano-texture glass specifically because his studio runs multiple LED strips and accent lights. Standard glossy monitor glass turns those sources into visible reflections across your screen, which makes color grading unreliable. The nano-texture coating diffuses those reflections without degrading the image the way a matte plastic screen protector would.
If you are editing in a studio with any serious lighting rig, this is not a luxury consideration. I learned this the hard way years ago when I delivered a beauty campaign that looked slightly warm in print. The monitor I was editing on was reflecting a tungsten practical lamp behind me and skewing my perception of the image. Anti-reflective glass eliminates that variable. It does not replace calibration, but it removes one more thing that can fool your eye.
Step 5: Treat Hydration and Small Habits as Workflow Infrastructure
 Sparkling water poured into pint glass on desk
McKinnon mentions pouring sparkling water into a pint glass so he can see the volume and actually drink it rather than cracking a can and forgetting it. This is a small thing that reflects a larger discipline: structuring your environment so that healthy defaults are the easy choice. It sounds far from photography, but it is the same thinking that goes into labeling every modifier in a kit so you grab the right one fast.
Sparkling water poured into pint glass on desk
McKinnon mentions pouring sparkling water into a pint glass so he can see the volume and actually drink it rather than cracking a can and forgetting it. This is a small thing that reflects a larger discipline: structuring your environment so that healthy defaults are the easy choice. It sounds far from photography, but it is the same thinking that goes into labeling every modifier in a kit so you grab the right one fast.
Desk setups that support long editing sessions need to account for the fact that you will be sitting in them for hours. Water, a good chair at the right height, and a monitor at the correct distance are not comfort extras. They are the infrastructure that keeps your judgment sharp through the back half of a long retouch session.
What I Would Add: Calibrate Before Any Major Delivery, Every Time
McKinnon’s setup runs through a MacBook Pro 16-inch pushing a high-end display, which is a strong foundation. What I would layer on top of any desk setup, regardless of monitor quality, is a calibration schedule. I run a colorimeter check before every client delivery. The hardware does not drift far between sessions but it does drift, especially in a studio with changing ambient light through seasons. The best monitor in the wrong calibration state is still a liability. Build the calibration step into the workflow the same way you build in a card backup step. It takes four minutes and it closes a gap that can otherwise cost you a reprint or a client conversation you do not want to have.
The core lesson from McKinnon’s desk tour is one I keep coming back to: your physical environment is an active participant in the quality of your work. The desk, the monitor position, the lighting, the small habits, all of it compounds. Getting it right is not about gear acquisition. It is about designing a space where doing good work is the path of least resistance.
Watch the full tutorial on YouTube and pay attention to the reasoning behind each choice, not just the products. That reasoning is what transfers to your own setup.
Comments
Leave a Comment