Why Lighting Ratios Are the First Thing I Check When a Studio Shot Isn't Working

Why Lighting Ratios Are the First Thing I Check When a Studio Shot Isn't Working

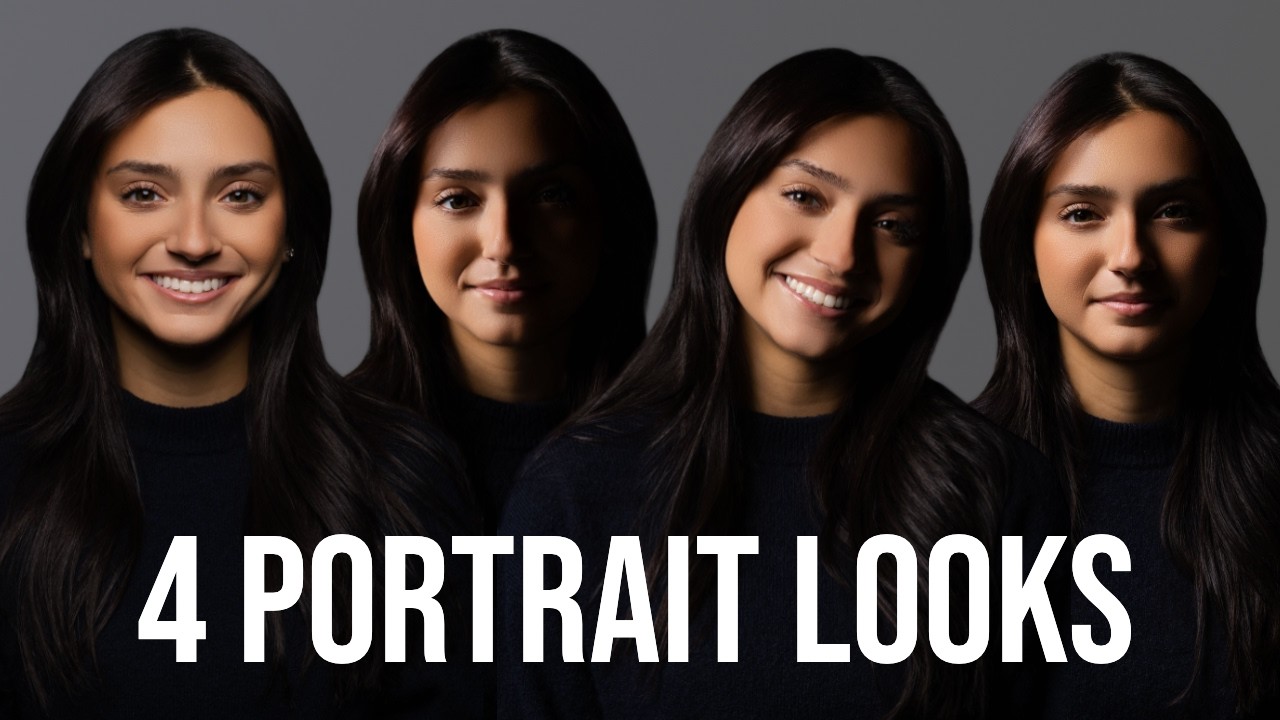
A few months back I was mid-way through a beauty editorial, two hours in, and something was off. The skin tones looked flat on one side and blown out on the other, and I kept adjusting my key light position when the real problem was simpler and more embarrassing. My ratio was wrong. I had not set a deliberate relationship between my key and fill before the first frame. I was chasing a symptom instead of diagnosing the cause.

One Light, Done Right: How a Single Strobe Can Outperform a Five-Light Setup

One Light, Done Right: How a Single Strobe Can Outperform a Five-Light Setup

The Overcomplicated Studio Is Usually a Confidence Problem Early in my career I watched a photographer I deeply respected spend forty-five minutes adjusting a six-light setup for a headshot. He kept adding lights to fix problems the previous lights had created. A rim light to separate the subject from the background. A hair light to compensate for the rim light killing the shadow detail. A kicker on the opposite side because now the image felt unbalanced.

Rim Lighting Done Right: The Setup That Separates Flat Studio Shots from Images That Actually Sell

Rim Lighting Done Right: The Setup That Separates Flat Studio Shots from Images That Actually Sell

I pulled a tear-out from a magazine once, a full-page beauty editorial, and spent about forty minutes staring at the catchlights and shadow edges trying to reverse-engineer the setup. Two rim lights, one key, a reflector below the chin. I sketched it in my lighting journal, taped it to the wall, and built it. The first test frame looked almost identical to the tear-out. That was the day I understood that rim lighting is not a creative accident.

The Science of Authentic Smiles: Why Say Cheese Fails in the Studio

The Science of Authentic Smiles: Why Say Cheese Fails in the Studio

The Science of Authentic Smiles: Why “Say Cheese” Fails in the Studio I’ve watched hundreds of photographers default to the same tired direction: “Say cheese!” Then I watch their clients deliver exactly what you’d expect—a tight, uncomfortable grimace that screams artifice. It’s a studio epidemic, and frankly, it needs to stop. The problem isn’t subtle. When you ask someone to say a word with a hard “ch” sound, you’re actually triggering the wrong facial muscles.

One Light, Done Right: How a Single Strobe Can Outwork a Five-Head Setup

One Light, Done Right: How a Single Strobe Can Outwork a Five-Head Setup

I used to own eleven lights. I counted them once while reorganizing my studio on a slow Tuesday, and the number genuinely embarrassed me. Not because eleven is too many, but because I could trace the purchase of at least four of them to insecurity. Some shoot went sideways, and my instinct was to buy another head, another fill, another hair light, as if more gear would paper over whatever I didn’t understand yet.

The Architecture of Posing: Building Flattering Angles Like You're Planning a Building

The Architecture of Posing: Building Flattering Angles Like You're Planning a Building

The Architecture of Posing: Building Flattering Angles Like You’re Planning a Building I’ve watched photographers waste exceptional light on poor posing. It’s like buying premium ingredients and burning the dish. The two aren’t separate—posing is part of your lighting equation. Get the pose wrong, and even perfect three-point lighting fails. Here’s what I’ve learned after thousands of sessions: posing isn’t artistic intuition. It’s geometry. Treat it like a recipe with specific measurements, and your results become predictable and repeatable.

The Four Lighting Patterns Every Studio Photographer Must Master

The Four Lighting Patterns Every Studio Photographer Must Master

In this excellent tutorial, Joel Grimes breaks down the intimidating world of studio portrait lighting into four manageable, repeatable patterns. If you’ve ever felt overwhelmed by the complexity of studio work, this is exactly where you need to start. I’ve been lighting portraits for fifteen years, and I can tell you with absolute certainty: these four patterns are the foundation of professional photography. Master them, and you’ll immediately understand why your portraits suddenly look like they belong in a portfolio instead of on Instagram.

The Five Posing Fundamentals That Actually Work

The Five Posing Fundamentals That Actually Work

The Five Posing Fundamentals That Actually Work I’ve watched photographers spend thousands on lights, modifiers, and reflectors—then squander it all by positioning their subject like a department store mannequin. Posing isn’t art; it’s applied geometry. Get the angles right, and lighting does half the work for you. After fifteen years in studio work, I’ve distilled posing down to five non-negotiable principles. Follow these, and you’ll see immediate improvement. Ignore them, and no amount of gear will save you.

The Architecture of Posing: How to Position Your Subject for Maximum Impact

The Architecture of Posing: How to Position Your Subject for Maximum Impact

The Architecture of Posing: How to Position Your Subject for Maximum Impact I’ve spent twenty years behind the camera, and I can tell you this with absolute certainty: your lighting setup is only half the equation. A perfectly sculpted three-point light setup means nothing if your subject is standing like a mannequin with their shoulders squared to the camera. Posing isn’t art—it’s architecture. It’s the deliberate placement of lines, angles, and negative space.

Rim Lighting: The Technique That Separates Amateurs From Professionals

Rim Lighting: The Technique That Separates Amateurs From Professionals

What Rim Lighting Actually Does Rim lighting isn’t decorative—it’s functional. When placed correctly, a rim light creates a bright edge along your subject’s outline, separating them from the background and adding three-dimensional depth to flat studio environments. I’ve watched photographers obsess over key lights and fill ratios while ignoring this critical tool. That’s a mistake. The rim light accomplishes three things: it defines edges (especially hair), it creates visual separation between subject and background, and it adds a professional polish that clients immediately notice, even if they can’t articulate why.

Rim Lighting: The Essential Technique for Separation and Dimension

Rim Lighting: The Essential Technique for Separation and Dimension

Rim Lighting: The Essential Technique for Separation and Dimension I’ve used rim lighting in roughly 70% of my studio work over the past fifteen years, and I’m not exaggerating when I say it’s transformed how my subjects read in frame. A rim light—also called a backlight or hair light—is a dedicated light source positioned behind your subject to create a glowing outline that separates them from the background. Done correctly, it’s invisible to the casual viewer but absolutely critical to the overall image.

Master These Four Fundamental Portrait Lighting Setups to Transform Your Studio Work

Master These Four Fundamental Portrait Lighting Setups to Transform Your Studio Work

The Foundation That Every Portrait Photographer Needs I’ve spent years refining my approach to portrait lighting, and I can say with confidence that mastering foundational patterns is non-negotiable. Too many photographers jump straight into complex multi-light setups without understanding the principles that make lighting work. It’s like trying to bake without knowing the difference between creaming butter and folding ingredients—you’ll get inconsistent results that frustrate you. The reality is this: once you understand four core lighting patterns, you have a repeatable system that works across nearly every client scenario.