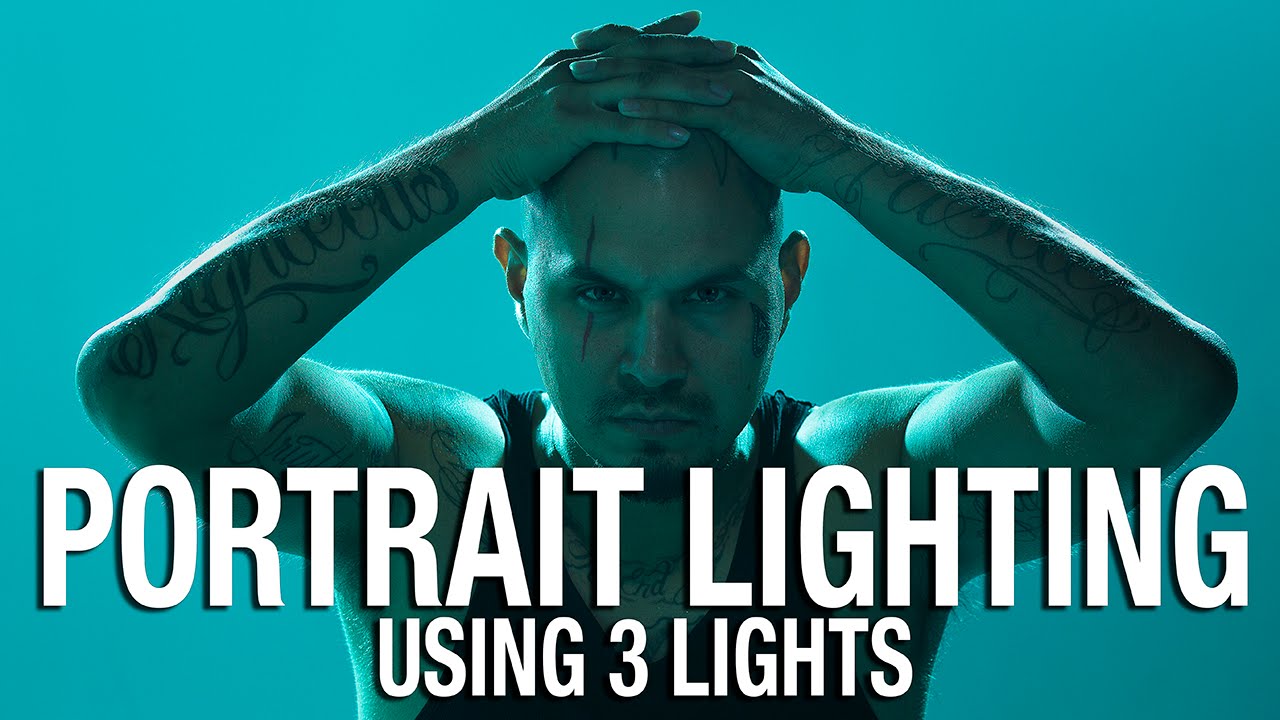
There’s a setup problem I run into constantly on commercial jobs: the client wants drama, the budget allows for maybe a half-day studio rental, and I need to build a look that feels expensive without stacking up eight light heads and a crew of three assistants. The answer, almost every time, is learning to do more with less. Colored rim lights, a tight modifier on the key, and a reflector you found leaning against the wall. That’s not compromise. That’s control.
In this The Slanted Lens tutorial, Jay P. Morgan builds exactly that kind of setup. Watch the full tutorial on YouTube before or after reading this, because seeing the actual result helps contextualize every decision below. The finished portrait is a moody, blue-drenched image with a subject who looks sculpted by light rather than just illuminated by it. Three lights and a piece of bead board got him there. Here’s how it works.
Step 1: Choose a Color Direction and Commit to It
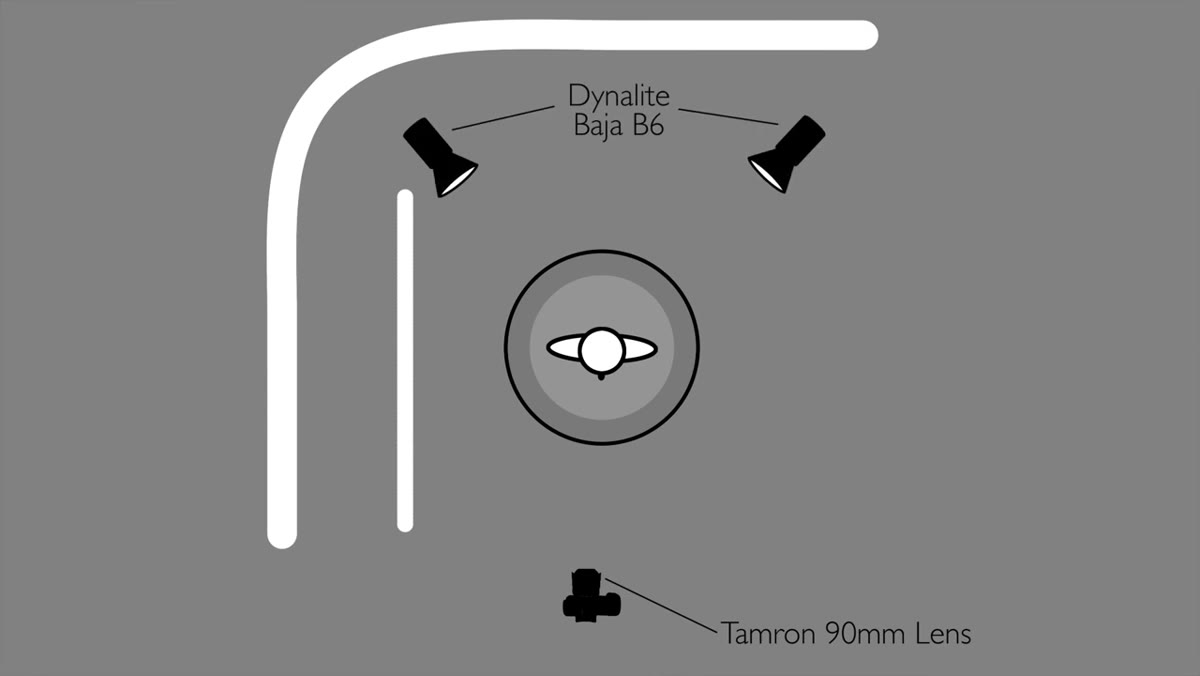 Two rim lights positioned on either side of subject
Morgan starts with two lights placed at the back on either side of the subject, both fitted with modifiers that throw a cyan-tinted output. The color he uses is described as a “cyan 60,” which functions roughly like a CTB (color temperature blue) gel pushed toward the cooler, more saturated end of the spectrum. These are rim lights, positioned to wrap a band of color around the edges of the subject’s shoulders and head.
Two rim lights positioned on either side of subject
Morgan starts with two lights placed at the back on either side of the subject, both fitted with modifiers that throw a cyan-tinted output. The color he uses is described as a “cyan 60,” which functions roughly like a CTB (color temperature blue) gel pushed toward the cooler, more saturated end of the spectrum. These are rim lights, positioned to wrap a band of color around the edges of the subject’s shoulders and head.
What I find instructive here is the decision-making process. He initially had a red background light in the mix. The red wasn’t working because the blue from the rims was spilling onto the background and muddying the color relationship. Rather than fight it, he pulled the red, let the blue rims do everything, and discovered the all-blue look was stronger. The lesson: when you introduce color, let one hue dominate. Competing colors rarely read as “complex.” They just read as dirty.
Step 2: Position the Rims for a Double-Rim Effect
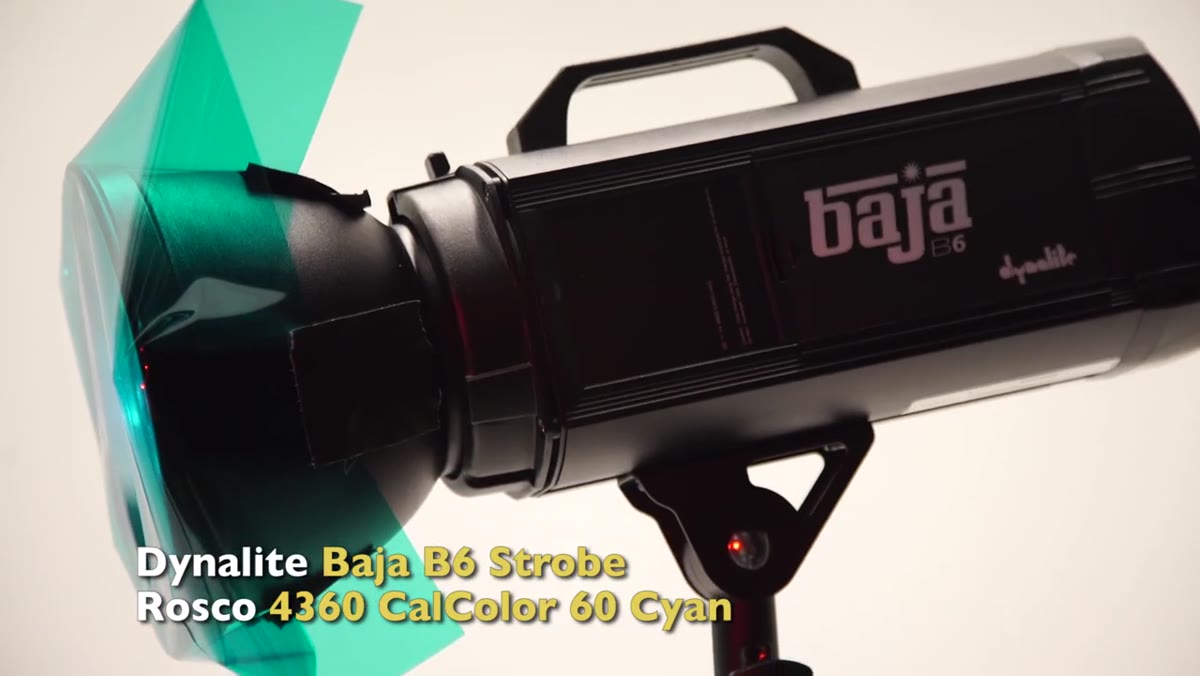 Cyan-gelled rim lights creating edge separation on subject
A double rim means you have a light source on each side of the subject from behind, both aimed toward the camera. These are not at 45 degrees from behind. They’re closer to the 90-to-120-degree range, placed well behind the subject’s plane and angled forward. The goal is to trace the edge of the body with color, not to fill the face.
Cyan-gelled rim lights creating edge separation on subject
A double rim means you have a light source on each side of the subject from behind, both aimed toward the camera. These are not at 45 degrees from behind. They’re closer to the 90-to-120-degree range, placed well behind the subject’s plane and angled forward. The goal is to trace the edge of the body with color, not to fill the face.
Feathering matters here. You want the light to catch the shoulder, the jaw, the ear. If the rim bleeds too far forward onto the cheek or forehead, it starts competing with your key. Keep it tight to the edge. Morgan’s blue rims produce a clean separation between the subject and the background without any additional background light needed, because the spill from the rims is doing that ambient work on its own.
Step 3: Build the Key Light Around a Snoot and a Grid
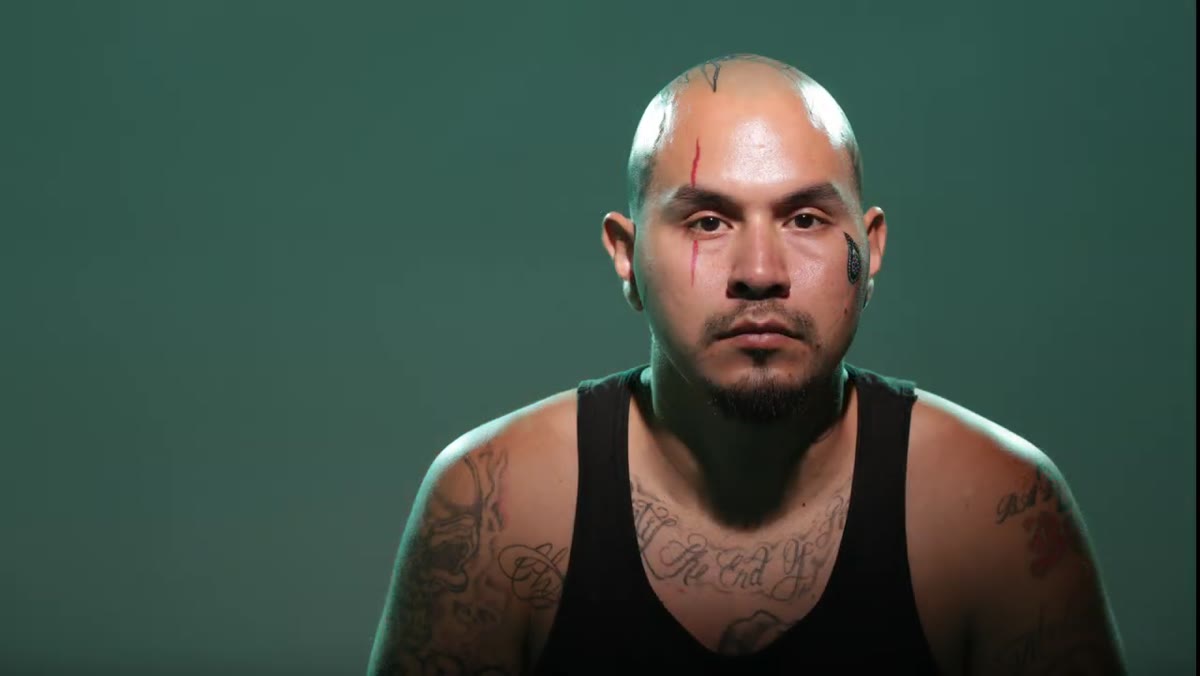 Snooted key light with 20-degree grid aimed at subject’s face
The key light in this setup is intentionally understated. Morgan uses a snoot combined with a 20-degree grid and wraps black wrap tightly around the modifier to further restrict the spread of light. The result is a narrow, concentrated beam that lands primarily on the subject’s face without spilling onto the background or washing out the color from the rims.
Snooted key light with 20-degree grid aimed at subject’s face
The key light in this setup is intentionally understated. Morgan uses a snoot combined with a 20-degree grid and wraps black wrap tightly around the modifier to further restrict the spread of light. The result is a narrow, concentrated beam that lands primarily on the subject’s face without spilling onto the background or washing out the color from the rims.
This is a setup I’ve used for beauty work when the art director wants “luminous but dark.” The grid kills the scatter. The black wrap kills whatever the grid missed. What arrives on the subject’s skin is clean, directional light that reads as a soft glow rather than a hard flash. The power level is also kept low here deliberately. You’re not trying to overpower the rims. You’re trying to open the shadows on the face just enough that the subject doesn’t disappear into the dark.
Step 4: Add a Foam Board Reflector for Subtle Fill
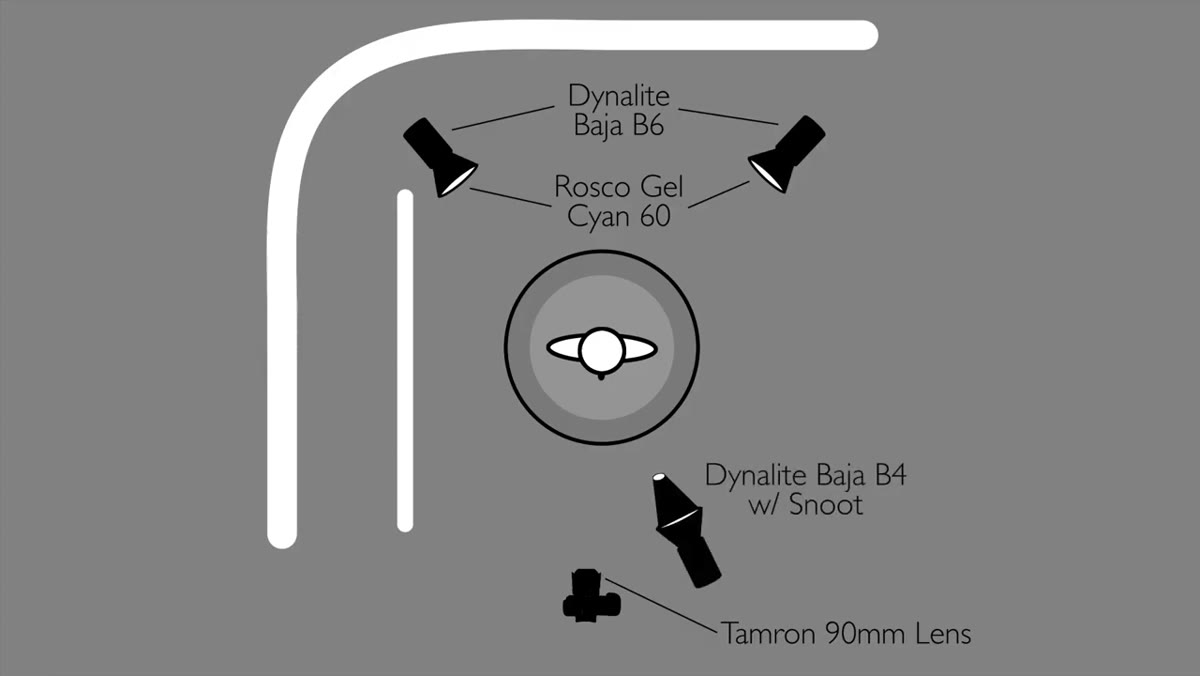 Bead board positioned in foreground below subject’s face
The final piece of the setup is the simplest: a piece of white bead board (foam core) placed low and in front of the subject. It catches the spill from the key light and bounces it upward into the underside of the jaw and chin. No power setting. No modifier. Just a reflector positioned to recycle light that would otherwise hit the floor and disappear.
Bead board positioned in foreground below subject’s face
The final piece of the setup is the simplest: a piece of white bead board (foam core) placed low and in front of the subject. It catches the spill from the key light and bounces it upward into the underside of the jaw and chin. No power setting. No modifier. Just a reflector positioned to recycle light that would otherwise hit the floor and disappear.
I keep a few pieces of foam core in every size leaning against the wall of my studio, labeled by size because yes, I label everything in there. The 24x36 piece gets used on almost every headshot job I book. The cost is zero. The effect on the catchlights and the under-chin shadows is noticeable every single time. Don’t underestimate a reflector just because it doesn’t plug in.
Step 5: Set Your Camera for the Low-Light Environment
 Camera settings displayed for low-light portrait exposure
For the portrait portion of the shoot, Morgan is working with a relatively low ISO (100), an aperture of f/5.6, and a 90mm lens. The 90mm focal length is doing the flattering compression work you’d expect from a portrait-length lens, keeping the face proportional and the background reasonably blurred without going so long that you’re fighting the framing.
Camera settings displayed for low-light portrait exposure
For the portrait portion of the shoot, Morgan is working with a relatively low ISO (100), an aperture of f/5.6, and a 90mm lens. The 90mm focal length is doing the flattering compression work you’d expect from a portrait-length lens, keeping the face proportional and the background reasonably blurred without going so long that you’re fighting the framing.
The exposure settings reflect the fact that this is a strobe-driven setup in a dark room. The ambient is not contributing meaningfully to the exposure. The strobes are doing all the work. That’s worth noting: in a setup like this, your shutter speed (within sync range) doesn’t affect exposure the way it would outdoors. What you’re controlling is the flash power, the subject-to-light distance, and the aperture. ISO stays low. Shutter stays at or below your sync speed.
What I’d Do Differently on a Commercial Job
The color gels Morgan uses are a fairly saturated cyan, which reads beautifully on video and editorial. For a fashion or beauty client, I’d test a slightly more restrained blue before committing. Full-saturation cyan can be unforgiving on certain skin tones and sometimes needs to be walked back in post anyway.
I’d also sketch this setup before the shoot. I keep a lighting journal, and when I look back at past jobs, some of my most efficient studio days came from arriving with a diagram already on paper and knowing exactly where the first light goes. Setups like this one, rim-heavy with a tight key, can fall apart quickly if the rims are too powerful relative to the key. Dialing it in before you have a paid subject sitting in the chair saves everyone time.
The single most important takeaway from this tutorial is that restraint produces mood. Every decision Morgan makes here is about containing the light: a snooted key, a tight grid, black wrap, low power, a reflector instead of a fourth light. More light sources do not automatically mean a better portrait. The best portrait lighting is the minimum light required to tell the story you want to tell.
Watch the full tutorial on YouTube to see the final portrait and the setup in context. The Slanted Lens does consistently strong work on practical, real-world lighting setups, and this one is worth adding to your reference library.
Comments (3)
Wow, I had no idea you could do this. Mind blown.
Tried this technique this morning. Game changer for real.
Love this. I referenced a similar technique in one of my recent posts. Always good to see other perspectives.
Leave a Comment