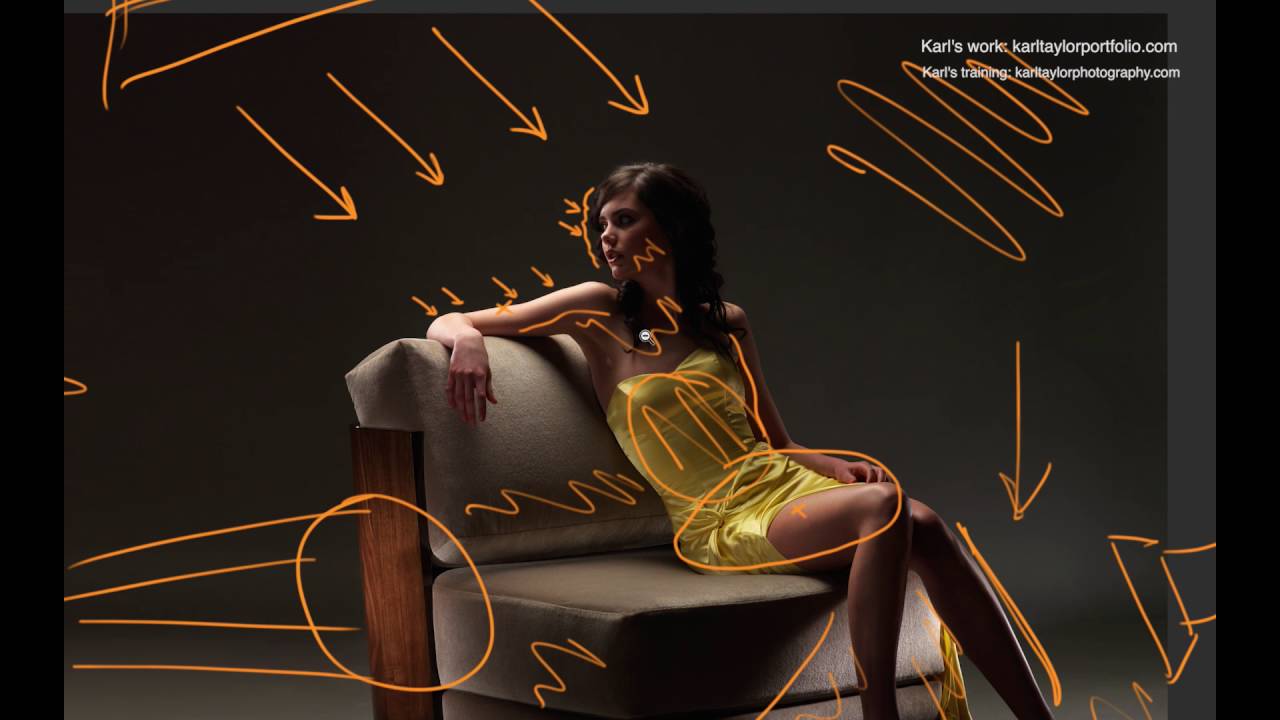
Every time I finish a commercial shoot and review the selects, I flip back through my lighting journal and check what I sketched before the first frame fired. More often than not, the setup that worked was not the setup I planned. It was the one I adjusted after reading the shadows. That habit, paying close attention to what the dark areas are doing rather than obsessing over the bright ones, is something I picked up slowly over years of editorial work. It took a long time before I could put it into clear language.
Then I watched this Visual Education tutorial from Karl Taylor. Watch the full tutorial on YouTube He breaks down a multi-light advertising shot for a furniture company, walking through every modifier and placement decision while the image is on screen. What hit me was not the gear list. It was how methodically he reads a finished image backward, identifying each light source by the quality and direction of the highlights it left behind. That is a skill most photographers never formalize, and watching him do it out loud is worth the fifteen minutes.
The shot itself is a seated model in a bespoke chair against a gray paper background. At first glance it looks like a two-light setup. It is not. There are at least five light sources working together, and the only reason the image does not look overlit is that Karl controlled the shadows just as deliberately as he controlled the highlights. Here is how he did it.
Step 1: Place Your Key Light Behind and Above the Subject
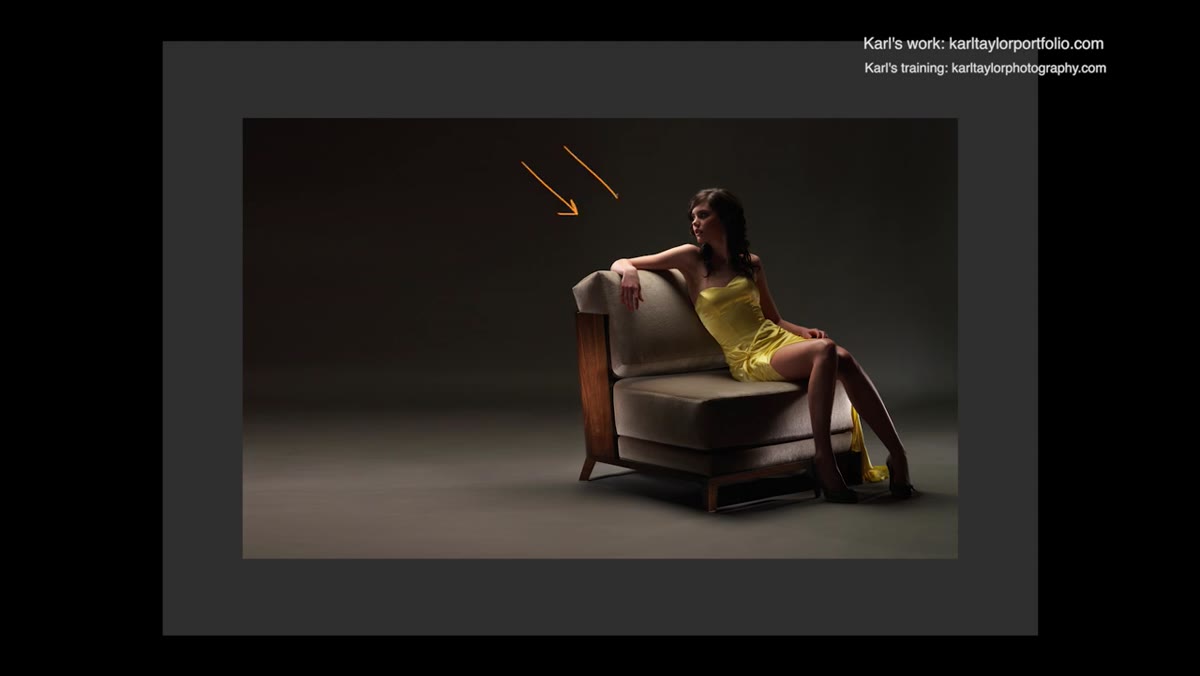 Sketch overlay showing key light position behind the model
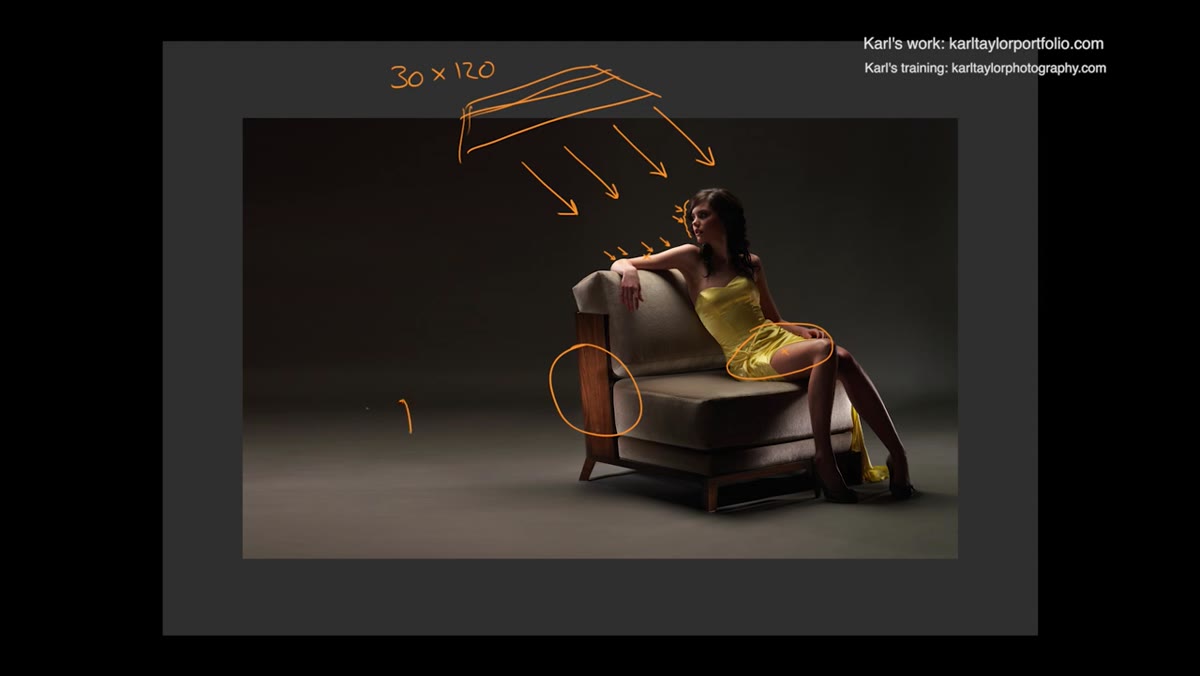
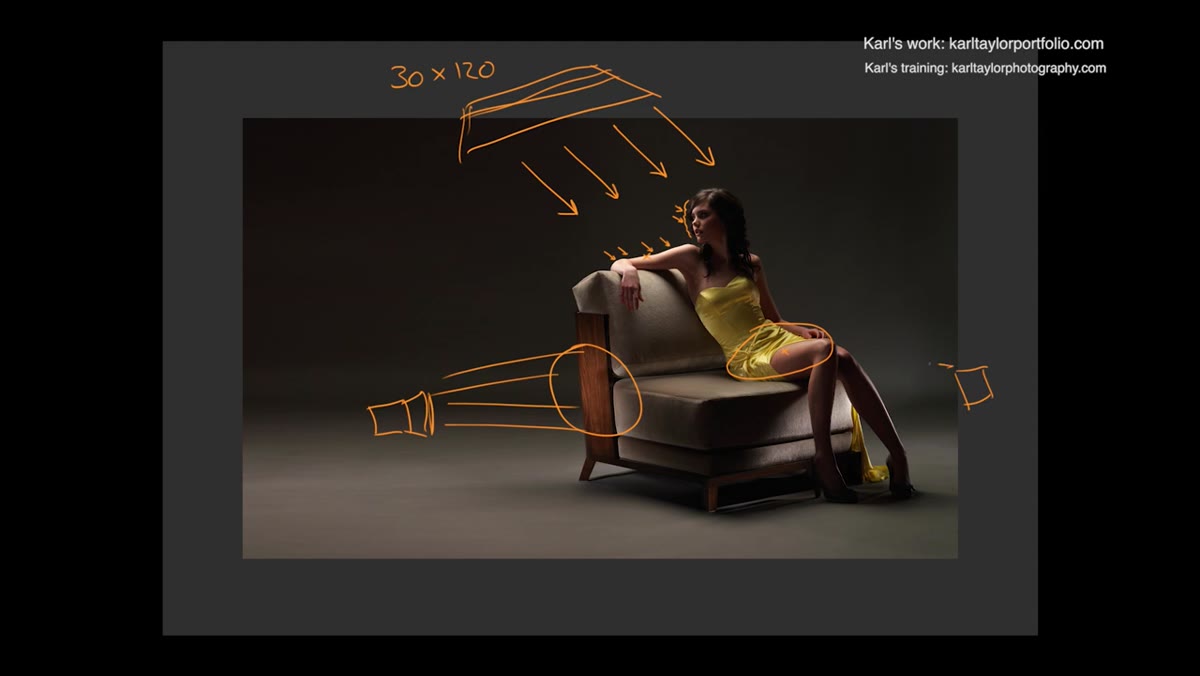
The primary light source in this image is a 30x120cm strip softbox positioned behind the model and elevated above her. It is not a front key. It is almost a rim-backlight hybrid, which is why the arm closest to camera reads as the brightest point in the frame. When you see a limb or shoulder glowing with the highest intensity in a shot, that tells you the strongest light source is somewhere behind that area, not in front of it.
Sketch overlay showing key light position behind the model
The primary light source in this image is a 30x120cm strip softbox positioned behind the model and elevated above her. It is not a front key. It is almost a rim-backlight hybrid, which is why the arm closest to camera reads as the brightest point in the frame. When you see a limb or shoulder glowing with the highest intensity in a shot, that tells you the strongest light source is somewhere behind that area, not in front of it.
If you are setting this up yourself, start with the strip box high and behind your subject at roughly a 45-degree diagonal. Fire a test frame and look at where the sharpest falloff is. That falloff line is your map for every other light you will add.
Step 2: Use the Inverse Square Law to Your Advantage on Distant Limbs
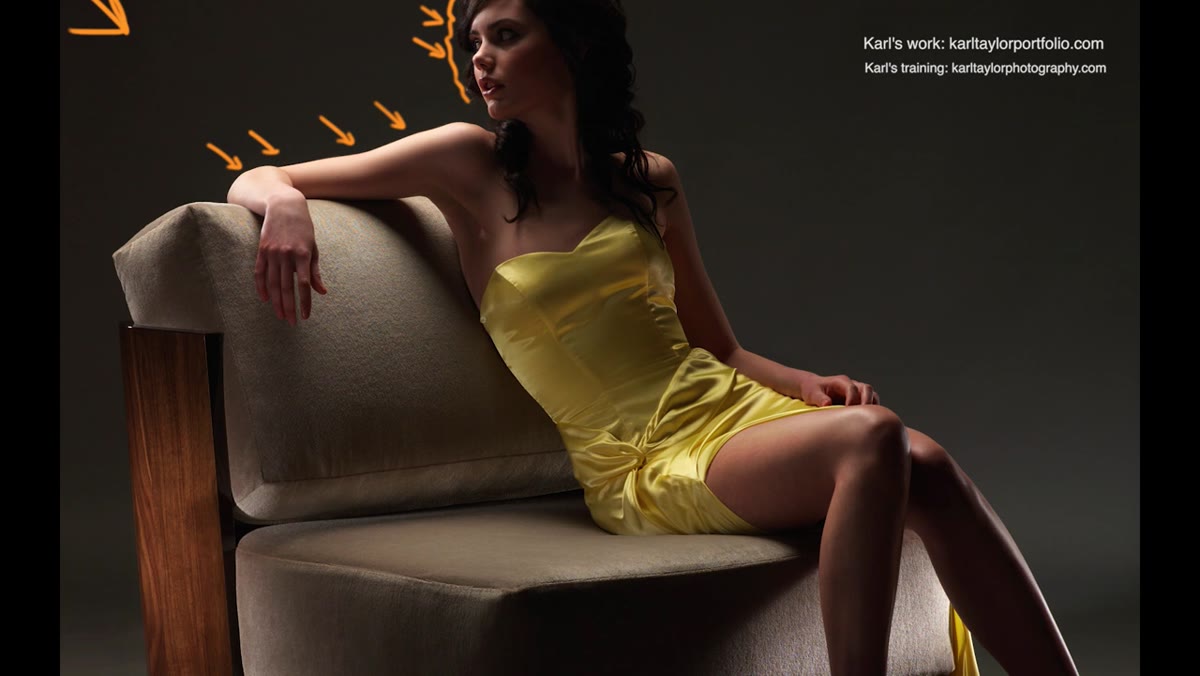 Image detail showing weaker light on the lower leg versus the arm
Karl points out that the lower leg in the image receives less intensity from that same strip box. This is not an accident or a problem he corrected in post. He used it. Because the leg is farther from the source than the arm, the inverse square law does the shaping work for him. The light falls off naturally, creating tonal separation across the body without a second modifier.
Image detail showing weaker light on the lower leg versus the arm
Karl points out that the lower leg in the image receives less intensity from that same strip box. This is not an accident or a problem he corrected in post. He used it. Because the leg is farther from the source than the arm, the inverse square law does the shaping work for him. The light falls off naturally, creating tonal separation across the body without a second modifier.
This is why source distance matters so much more than output power. Moving your key light two feet farther back does not just make it dimmer. It changes the entire gradient of light across your subject. Before you add another light to solve a “dark area” problem, first ask whether repositioning the source would give you the graduation you actually want.
Step 3: Add a Gridded Light to Isolate a Specific Zone
 Grid light position indicated on the sketch, aimed at the torso area
The second light is a standard studio head with a reflector and a honeycomb grid, aimed at the central body area. A grid restricts the beam angle, which means it can hit a precise zone on your subject without spilling onto the background or washing out adjacent areas. In this case, it lifts the torso section of the image without competing with the key light on the arm.
Grid light position indicated on the sketch, aimed at the torso area
The second light is a standard studio head with a reflector and a honeycomb grid, aimed at the central body area. A grid restricts the beam angle, which means it can hit a precise zone on your subject without spilling onto the background or washing out adjacent areas. In this case, it lifts the torso section of the image without competing with the key light on the arm.
When I test a new grid modifier in my studio, I always fire it in isolation first to see exactly where the edges of the beam land on my subject stand. That gives me a reference point before I layer it into a full setup. Without that check, you end up with overlapping pools of light that flatten everything.
Step 4: Run a Low Sidelight With Barn Doors for Floor and Leg Detail
 Low stand with barn doors catching light on the floor and lower leg
A third light sits low on a floor stand on the opposite side, fitted with barn doors. It grazes across the floor and catches the edge of the near leg. Barn doors give you directional control without needing a grid, which is useful when you want a soft edge rather than a hard cutoff. The low placement means the light skims the surface at a shallow angle, picking up texture and dimension that a higher source would flatten.
Low stand with barn doors catching light on the floor and lower leg
A third light sits low on a floor stand on the opposite side, fitted with barn doors. It grazes across the floor and catches the edge of the near leg. Barn doors give you directional control without needing a grid, which is useful when you want a soft edge rather than a hard cutoff. The low placement means the light skims the surface at a shallow angle, picking up texture and dimension that a higher source would flatten.
Keep this light dim. It is an accent, not a fill. Its job is to separate the leg from the background and add a sense of depth to the lower portion of the frame. If it is too bright, it fights the key and makes the bottom third of the image look separately lit, which kills the cohesion of the whole setup.
Step 5: Fill the Shadows With Bounced Ambient, Not a Direct Fill Light
 Karl explaining general fill bounced off ceiling and walls
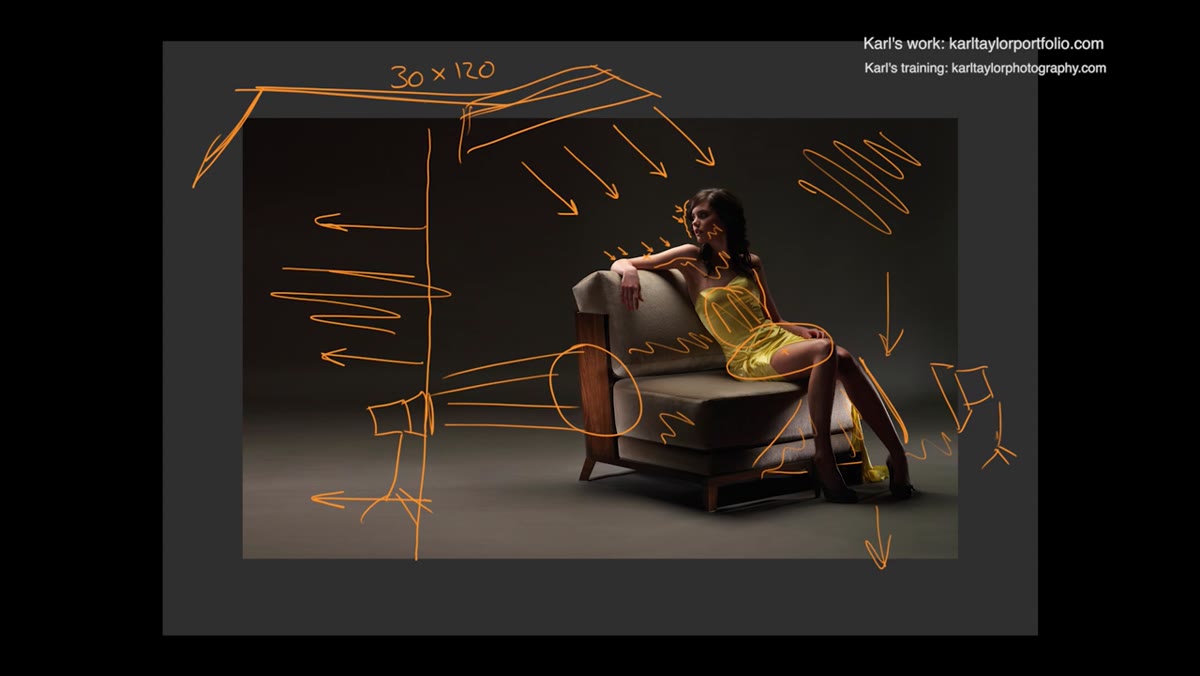
This is the step most photographers either skip or get wrong. Karl controls shadow density by firing a light into the ceiling, the walls, or large poly boards placed behind camera. The result is soft, directionless ambient fill that lifts the darkest areas of the image without creating a second catchlight or a competing shadow. It does not look like a fill light. It just looks like the shadows have detail.
Karl explaining general fill bounced off ceiling and walls
This is the step most photographers either skip or get wrong. Karl controls shadow density by firing a light into the ceiling, the walls, or large poly boards placed behind camera. The result is soft, directionless ambient fill that lifts the darkest areas of the image without creating a second catchlight or a competing shadow. It does not look like a fill light. It just looks like the shadows have detail.
Direct fill lights aimed at a subject from the front almost always leave their signature somewhere. Bounced fill does not. The tradeoff is that you have less precise control over intensity, which is why Karl treats it as a global ambient adjustment rather than a targeted fix for one shadow.
Step 6: Extend the Canvas When the Shot Has a Copy Requirement
 Karl indicating where the image was extended for advertising copy
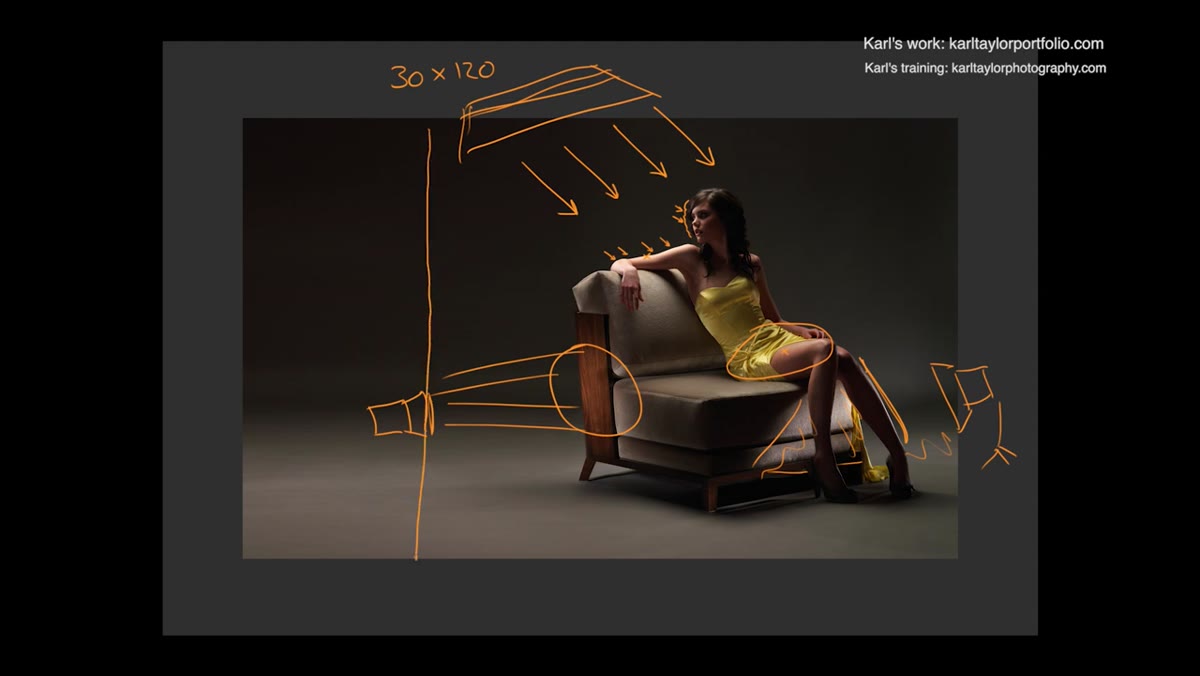
The final image was extended beyond its original crop to create space for advertising text. Karl mentions this matter-of-factly, but it is worth flagging as a workflow consideration. If you know a shot is destined for an ad layout, discuss the copy placement with the art director before you shoot. Understanding where the text will sit tells you how much tonal space you need to preserve in that region, and whether your background lighting needs to stay even across a wider area than the model alone would require.
Karl indicating where the image was extended for advertising copy
The final image was extended beyond its original crop to create space for advertising text. Karl mentions this matter-of-factly, but it is worth flagging as a workflow consideration. If you know a shot is destined for an ad layout, discuss the copy placement with the art director before you shoot. Understanding where the text will sit tells you how much tonal space you need to preserve in that region, and whether your background lighting needs to stay even across a wider area than the model alone would require.
What I Do Differently in My Own Setup
I keep a strip of masking tape on every light stand in my studio with the modifier name written on it. When I am working through a complex multi-light setup like this one, being able to glance across the studio and read “strip 30x120” or “grid spot” without walking over saves real time during adjustments. It sounds trivial. On a ten-hour commercial day with a client watching, it is not.
The deeper lesson from Karl’s walkthrough is about sequence. He built this image from the key outward, adding each light only after he understood what the previous one was doing. That is the opposite of how most people learn multi-light setups, where they replicate a diagram all at once and then struggle to diagnose what is wrong. Build one light at a time. Shoot between every addition. The shadows will tell you exactly what to do next.
The single thing worth taking away from this tutorial is that shadow control is the real skill in complex studio lighting. Anyone can add lights. Knowing how to keep the dark areas from going dead while still reading as shadows is what separates a finished commercial image from a snapshot with expensive gear. Watch the full tutorial on YouTube and pay particular attention to how Karl talks about what he is not lighting. That is where the real instruction is.
Comments (3)
Wow, I had no idea you could do this. Mind blown.
Just subscribed. If the rest of your content is this good, I'm in.
Love this. I referenced a similar technique in one of my recent posts. Always good to see other perspectives.
Leave a Comment